Sunday, November 25, 2012

Teacher Gift Tins

Well, the snow is falling and friends are calling "yoo-hoo." A new friend of mine invited me to be a part of her 16th annual Christmas Boutique this December and I have been a busy little elf the last few weeks getting ready for it.  One of the craft items I will be selling are these cute and practical gift tins, targeted especially for those looking to give their kids' teachers a gift in the $10-15 range. These fun little packages would also be great for the college student in your life, baby sitters, other office/service people that you like to give a little gift to at Christmas. I'm going to quickly explain how I made them here. I saw the basic idea on this blog here and the gal that made them on that blog found the idea at this blog. Ah the rabbit-trail that IS blog reading!

First, I did order the nugget tins from specialtybottle.com as one of the ladies recommended on her website. I looked quite a bit online and they had the best pricing. 


I carried one of these tins around with me in my purse for a couple of weeks as I was shopping for little items that would be practical and also inexpensive and, oh yeah, FIT! Once I was satisfied with what I had this is what I had amassed:


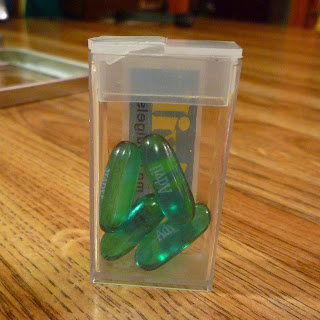
There are 2 Band Aids, 1 hand sanitizer, 1 6-piece pack of gum, a mini sharpie marker, a piece of Dove milk chocolate and one of dark chocolate, 4 Advil Liquigels, 5 paper clips in fun colors, 2 bulldog clips and a mini super glue. I kept all of my receipts and when I added up everything, including the tin, it came out to right around $4.75.  I found some really great deals like the mini bulldog clips at Office Depot in bags of 24 for $2, the hand sanitizer for $.33 (which I paid a dollar each for at Office Depot, and returned when I found them so much cheaper elsewhere!) Also the mini super glue, which I passed up because they were listed for $3.95/4 on the shelf, but I found in a bin for $2.00/4 at the checkout. Also, I purchased the Sharpie markers (which I had no idea were so spendy!) at Joann Fabric over the course of about a week and a half using 50%-60% off coupons!  Sorry to bore you with the details, but it was kind of a fun challenge to see how cheaply I could get things. Really quickly, for the Advil, I wasn't able to find the little 2-pill foil pouches like I wanted, so I ended up making my own mini containers by purchasing small plastic storage containers with a flip top (much like the ones tic-tacs come in.) I found these in the bead organization isle at Joann and, yes, I used a 50% off coupon!


I printed labels on transparent return address labels so the recipient of the gift would know the facts.


To make the dividers for the tin, start with you largest item first and figure out how big your largest compartment needs to be. For my tins, it was the gum. Cut a piece of cardstock that is as long as the tin, and as wide as the tin plus TWICE the dimension of your divider height. 


For example, in this case the cardstock needs to be 5" long by 3 1/2" PLUS two times 3/4" (or and inch and a half) so a total of 5". Measure over from one edge to allow enough room for your first item, giving just a tad extra and score along the length of the paper.  Measure over 3/4" and score again and once again measure over 3/4" and score. You should have three parallel score marks as shown in the illustration below.


Fold on the score marks. This will create the first ridge that divides the tin into two compartments lengthwise. Continue making cardstock inserts until you have all of the divisions you want.  It will take some playing around with the space and your items to get it all laid out in the most efficient manner. Once all of my dividers where in, this is what it looked like.


Now the fun part: filling the tin!


On display:


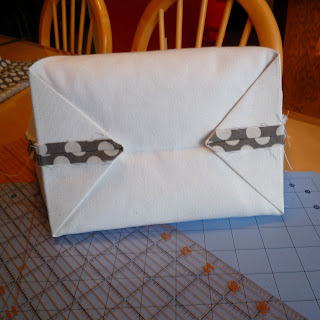
To finish the gift off, I made a decorative enclosure for a pad of Post-It notes to be attached to the top.


They pad is permanently affixed with glue and has a magnetic closure. This one says "thank You Teacher" but I also made ones that say "Merry Christmas" and "Just For You".


Just add a little ribbon and they're ready to go, no gift-wrap required. 


I have 30 of these available, no two alike.  I will be selling them for $12 each. As a shameless plug, for those in the area the Christmas Boutique is this Saturday, December 1st. The sale goes from 9-3 pm. Kim, the hostess, has been doing this for years and she makes FOUR HUNDRED DOZEN COOKIES!!  Yes, you read that right. She also invites lots of other quality vendors. The sale is on her family farm in Scandia MN, address is 22430 St. Croix Trail North (Highway 95). If you have questions for Kim, you can reach her at 651-433-3881. Hope to see you there!


Sunday, October 14, 2012

Baby Girl Shoes


 Well, I'm still coming down off of the fun of celebrating my friend Anna's baby shower.  So excited for her and her husband! What a lovely day!  There's something about baby girls and PINK that are so fun to work with.  This shower was pink with a capital P. The gift I gave Anna included a pair of baby shoes that I learned to make this past spring, thanks to my friend Lauren and her turning me on to the website Joyfolie. The woman at that website makes AMAZING baby shoes (and adult women's too) and sells a PDF pattern on her Etsy store for a simple baby shoe you can make at home. Here are the steps I used since I modified the pattern a little. First, cut out four pieces of each pattern piece, one out of the outer fabric and one out of the lining. Make sure to fold the fabric so either the right sides are together or the wrong sides are together before you cut so that the pieces will be mirror images of each other. If you don't make the pieces mirror images, you'll have shoes for two left feet (or two right feet!)  


Take the lining piece for one of the shoe uppers and stitch along the back of the heel, right sides together. Iron seam flat. Repeat for the other lining upper piece.


Pin the upper to the sole, right sides together.  The first shoe I sewed, I thought more pins = better.  It actually worked better on the second shoe with only a few pins around the edge. Stitch.


Next, clip close to the stitching (but not THROUGH it) around the curved parts of the toe and heel and press the hem under, towards the bottom of the shoe. Using a very thin layer of fabric glue, glue both layers of the hem down to the sole of the shoe.


Flipped over, it should look like this:


Repeat all of the above steps for the outer shoe fabric.


Now, with both the outer and the lining pieces turned inside out, apply a very thin layer of fabric glue to the whole sole of one piece and carefully line up the edges and adhere the other piece so they are glued sole-to-sole. Try to pinch and glue all the way to the edge. I prefer Beacon Fabri-Tac because it's thick and won't run or bleed through, adheres almost immediately, and dries fast.


Once the glue is dry enough to work with, turn the outside fabric right side out and work the lining in to place. Add a very thin layer of fabric glue between the lining and outer fabric on the sides and top of the shoe to hold the lining in place. If your lining fabric sticks up past the outside fabric in any spots, trim it so the raw edges are even.


You can use store bought bias tape, or make your own out of matching or contrasting fabric. The bias tape will be used to finish off the raw edge. To make your own, cut a 1" piece of fabric at a 45 degree angle to the grain of the fabric. Iron in half and then fold the raw edges in to the center so it's fold in quarters and steam press. You will really only need a small length of bias tape. Sorry I didn't measure the exact amount! This is how the fold should look from the end:


Use your trusty fabric glue again and, starting at the back of the heel and a little bit past the center line, glue the bias tape around the opening of the shoe.  Try to get the glue as close to the edge of the bias tape as possible, but not too much so that it squishes out. Try to get the raw edge of the shoe opening to nestle into the fold in the center of the bias tape.  Go around the entire shoe opening and back to the center of the back heel, overlapping slightly the end where you started.  Make sure the exposed end is glued well so it doesn't fray.  


To embellish I used two TEENY TINY flowers made using the technique I taught the February "Fabric Flower Clips" tutorial. Here are the finished shoes:


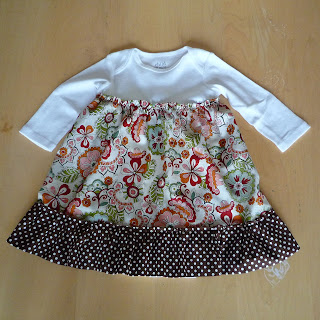
The baby gift was made complete by sewing a very quick and easy dress-made-from-a-onsie I found on this blog through Pinterest.


Since the onsies come in a three-pack, I jazzed up the two remaining ones with one simple fabric flower.


Pretty cute, pretty girly, pretty fun to make!


Sunday, October 7, 2012

Vintage Coffee Sign

While my husband and I spent the summer weekends at the marina we belong to, we got in the habit of going just a couple of miles up the road for breakfast every Saturday morning.  The little diner at the top of the hill is called The Point and has not only great, classic breakfast and coffee, but also some of the most entertaining small town, farmer-talk to eavesdrop on.  We enjoyed our mornings!  One of the other great things about The Point on the weekends is the wait staff; Rocky, Susie and Julie got to know us by part-way into the summer and had even put our order in to the the cook a couple of mornings before we walked through the doors, having seen us walking across the parking lot!  Towards the beginning of the summer John started teasing one of the gals, Susie, about getting bigger coffee cups so she wouldn't have to make so many trips to our table.  A week or so after that, remembering John's comments, Sue came out to the table with two huge coffee cups they keep back in the kitchen for "special" customers.  That continued right on through to the end of the summer.  As we got close to our last weekend for the summer, John and I decided it would be fun to give the waitresses something as a thank you for treating us so nicely all summer and also as a "remember us until next summer." Jokingly, John said something about making a sign that said "Small coffee cups are for wussies." I thought that sounded like a great idea and so here I walk you through the process by which I made our favorite waitresses their end of summer gift.

The first step to making this vintage coffee wall sign was to create and image on the computer.  While I love designing and creating digitally, I in no way claim to know what I'm doing.  I just know that I usually get the result I want by the end. I'm sure there are more efficient ways to design if you know your software.  I choose to use Microsoft Word most of the time because I've used it a lot and am familiar with it.  For this project I also used my Creative Memories Storybook Creator 4.0 because it is such a versatile and user friendly program.  To get inspired and get the feel of what a vintage coffee sign should look like, I did a Google images search.  This helped me pick colors and fonts. Here's the final image I came up with for our sign:


In my haste to get this project done, I made a rookie mistake.  If you are using an image with text on it, or if you are particular about the orientation of the image, DON'T FORGET TO INVERT (MIRROR) YOUR IMAGE!!!  It should look like this when printed:


You need to have this printed on regular printer paper and on a laser printer for the technique to work that I'm going to show you. This technique came from a Pinterest idea and comes from the blog Katie's Rose Cottage.
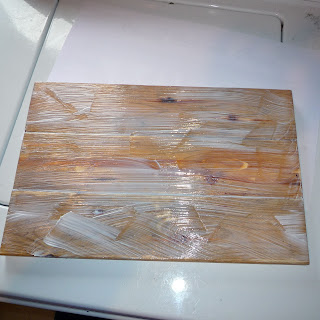
Once you have your image printed, you can determine the proper size for the wooden sign to be.  Mine came out to be 10" high by 15 1/2" long.  To make the wooden portion, I cut three slats of 1x4 that were 15 1/2" long.  When laid out side by side they totaled 10" wide.  I did mine in 3 pieces because I wanted it to have the look of an old pallet or piece of siding or something. That's just my aesthetic  You can do one solid piece of wood if you like.  To frame out the sign, I also cut some 1 1/4" strip pieces to go around the edges.  As you will see in the picture below, I aged the wood for the main body of the sign by using a technique that I also found on, you guessed it, PINTEREST! You can find the technique here if you are interested. I also had sanded off the long sides of the three pieces before aging them. This way the fact that it's three separate pieces would really stand out.


Next, glue the three 15 1/2" antiqued pieces together and clamp for an hour or two. After un-clamping, coat with a nice thick layer of acrylic gel medium, available at your local craft or art store. Make sure to get all the way out to the edges.


Once coated, center your printed image and lay face down into the adhesive  Use a plastic scraper or similar tool to smooth completely and get out any air bubbles. Try to avoid wrinkling the paper during this step.


If you make your wooden piece in sections like I did, make sure to really push the paper into the grooves between the sections. This will help insure that your image transfers into the grooves instead of there being a void in your picture where these lines are. 


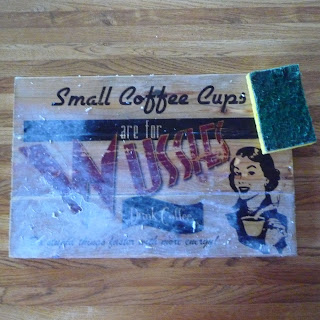
Make sure to clean all of the gel medium off of the edges of the wood after you squeegee it out.  You will have a fair amount squish out the sides, but that's OK.  It's much better to have a little too much glue rather than not enough.  If you use too little glue, your image will not transfer properly.  If you are like me and patience is something you could use a little more of, this next step is painful!  You have to let the paper/glue dry overnight (or at least 6 hours). Not only am I usually super excited to see the final product at this stage in a project, I'm usually working on it right up until the MINUTE I need it. So yeah, waiting is not my favorite. Trust me. Wait for this to dry overnight. Once completely dry, use a very wet rag and a gentle scratch pad to soak and remove ALL of the paper.  As you can see, the image stays affixed to the wood.  It does take a little elbow grease, but don't rub too hard or you risk taking off a little of the image. 


To frame out the sign and give it a nice finished edge, take the four trim pieces (I've painted mine red prior to this step and lightly sanded/distressed the edges) and glue and clamp evenly on the edges of the  main sign. Wait 1-2 hours for the wood glue to adhere.


For a final touch and to antique and age the sign slightly more, you can use one light coat of stain over the whole sign, including the trim pieces. To seal everything and make this wall hanging easier to dust, spray 1-2 coats of clear varnish over the whole works and let dry.  Attach a picture hanger on the back and you're finished.  This is a really inexpensive project and can be made in just a few hours (not counting waiting time!) Here's the final project:


Our friends the waitresses loved their gift and we found out when we gave it to them that the owner JUST ordered bigger coffee cups for the whole diner!  


Thursday, September 27, 2012

Everlasting Apples

As the air starts to get a nip to it, I turned my attention recently to redecorating my seasonal window.  I was flipping through my Martha Stewart Living mag and saw this lovely picture of a caramel apple with a stick made from a real tree branch (a small one of course!) I just loved it.


Pretty huh? From this picture I started getting the idea of how I wanted to decorate my window for the fall.  Of course I couldn't put REAL caramel apples in there, especially since I may not crawl up there for several months to redecorate! (For those of you who have not been in my house, I have the window frame about 10'-11' up on my wall, so it's kind of a production to change it out.) I started thinking about how I could reproduce this look with materials that would last...and last, and last, and last. First I had to find the products that would work.  I found a bag of 12 realistic faux apples at Michael's Craft Store for I think around $12, but I had a 50% off coupon, score! I needed to do a little pruning on one of my flowering crab apple trees anyhow, so I used the three best twigs from that. For the caramel, I purchased a bottle of craft acrylic paint that was a good caramely color. To add some shine and thickness to the caramel layer, I found a product called Triple Thick clear gloss glaze by Americana, also from Michael's.


I used the yellow paint and VERY light brush strokes to make some light yellow veins on one apple to make it look more realistic.  I had planned to paint all the apples with this technique, but actually liked them as they came from the store just fine. The first thing I did was remove the stems that came with the apples.  I had to use a small screwdriver to widen the opening a little, then I inserted one of the three twigs into the top of each.


Next, I poured about an inch and a half of the caramel colored paint into a small bowl not much bigger than the apples.  With a piece of parchment ready and laid out, I carefully dipped each apple. I held the dipped piece over the bowl and let the majority of the paint drip off, but didn't worry about having a little that would pool at the bottom. 


I will note, the first time I did this for each apple, I noticed that red from the apple dye started to run where the wet paint was.  I ended up letting the first layer of brown paint dry completely and then I sprayed each apple with two coats of satin clear enamel to seal the red color, then I redipped the brown and all was well! They required drying at least a day on the parchment. Once dry, I repeated the dipping but this time in the triple thick gloss glaze to give the "caramel" a shiny, thick look. Then back to the drying rack!


I wanted there to be a little puddle of brown paint around the bottom of each apple to mimic the pooling of the caramel on a real caramel apple. Once the apples were dried, I poured out a little of the brown paint directly on the parchment, spread it out a little to thin it out and set one apple in the center of each  blob of paint.  This took a little longer to dry, I think a day or two.  I was able to carefully peel one of the apples off the parchment once everything was dry, but quickly realized the layer of brown paint around the bottom was too fragile and thin and prone to breaking off.  Before removing any of the others, I coated the brown puddle of paint with a thick layer of the gloss glaze to thicken and strengthen it and make it shiny as well. 


Once they FINALLY dried (thanks to my husband for being patient as this sitting around the kitchen as the whole project took me a week or so), they were ready to go into the fall Extravaganza Window.


And here's a close-up of the one I brushed the faint yellow lines on:


And here's the final window display:


If you want to see the window designs that I've done to date, I post them here. Happy cocoa-apple-crisp-bonfire-soup FALL!


Sunday, July 22, 2012

Canvas Tote

Recently, I wanted to make some beach/tote bags for a few friends.  As I often do, I turned to the World Wide Web to find a pattern, or even just a picture/concept to inspire my creativity.  I found this fun idea for a self-closing tote bag here on the blog Design Sponge. Their pattern was better suited to the metric measurements they gave, so I made up my own dimensions by just eyeballing how big I wanted the bag to be. You could modify this pattern to make the bag any size.  First, cut two pieces as shown, one of canvas (or denim or duck cloth or any other semi-stiff fabric) and one of your contrasting fabric that will be on the bottom half of the outside of the bag and the lining. Cut the fabric on the fold in the 32" dimension, that fold will come in handy in future steps.  Press to make a crisp line with a steam iron.  Make sure the two pieces are going the opposite direction, meaning the two fabrics, when laid right side up, should be mirror images of each other.


Now cut a piece that will be the contrast on the bottom of the tote.  With the fabric folded in half, cut it the same width as your bag (in my case, 15") and however high you want it to go up the side of the bag. In my case, I made it 9" on the fold (18" total if you unfolded it.)  Fold a 1" hem under on each raw edge and press with steam iron as shown.


Use the crisp fold the you have ironed in on the center on both the canvas and the contrast, line up the two fabrics and pin in place. Sew a top stitch very close to the edge to attach the contrast to the canvas (see inset.)


Now fold the canvas in half, right sides together and stitch along the two sides.  I used a 1/2" seam. Once sewn, clip the bottom corners at a 45 degree angle. Fold the corners so that the side seam lines up with the bottom fold line creating a triangle and press. In the below photo you can see what the lines from where I pressed look like when unfolded. 


With the side seam lined up with the fold along the bottom of the bag, draw a light pencil line at a 45 degree angle.  I drew mine 4" in from the corner on each side, but you can make yours any size you want.  This seam will create the base, or bottom, of the bag. The bigger the "triangle", the bigger the base of your bag. Using a cutting mat with grid lines makes this job a cinch.


Stitch along your pencil line and then press with a hot steam iron so the two triangles fold under the bottom of the bag. 


Now follow all of the above steps for the lining fabric.  Fold in half, right sides together. Stitch along the side seams with 1/2" seam (or however wide you used in the above steps.) This time though, you will need to leave a 2"-3" opening in one of the side seams so you can turn the bag right side out in a few minutes. Compete the lining by folding the corners in a triangle, press, draw your line so the corner triangles are the same dimensions that you used for the outside of the bag. Stitch and press under towards the bottom of the bag. With the shell/outside of the bag turned RIGHT SIDE OUT and the lining turned INSIDE OUT, slip them together as shown below. I repeat, they should be RIGHT SIDES TOGETHER. Line up the raw edges, matching the seams and corners of the flaps, pin and stitch. Again, I used a 1/2" seam.  Before turning right side out, clip the corners of the flaps close to the seam and also cut a little slit in all the corners to ease the fabric and prevent puckering. 


Turn the bag right side out by pulling all the layers through the opening that you left in the side seam of the lining fabric.  Poke the fabric out in the corners and make sure the seam is pulled all the way right side out.  Press with a hot steam iron.  


Now with a top stitch very close to the edge, sew around the entire opening of the bag.  Also, at this point you can sew close to the edge and close the opening in the side seam of the lining where you pulled the bag through to turn it right side out. Picking a thread that is close to the color of your fabric ensures it will not be very visible.  The below photo shows a close up of the top stitching.


Using metal grommets purchased at the fabric store, I followed the manufacturer instructions for fastening them and put one in each flap as shown. The kit comes with a setting tool, a setting base, a top ring for the grommet and a bottom ring for the grommet, all shown below.


Using a rivet tool and rivets with small washers, I riveted the cotton strap to the bag.  I used a 3' piece of cotton strap purchased at the fabric store. Three feet seems to be a good length for the strap, but you can make yours any length you want.  Attach the rivets to one side of the bag and slide the strap through the grommet on the flap of the opposite side of the bag as shown. Repeat for the other flap. Tip from one who learned the hard way: make sure you thread your strap through so that it lays nicely and doesn't have any extra twists in it.  Once it's attached, it cannot be untwisted. 


For a finishing touch, I made two fabric flowers to pin on the front. These are really cute, versatile flowers that you could use for other purses, sweaters, hair, etc. Here's a quick version of the steps for creating those. Cut several circles out of the fabric of your choice.  I used 12 circles for each flower. I saved a ton of time but cutting them using my Cuttlebug die cutter and I used the 2 1/4" circle die.  I flamed the edges of my fabric lightly so it wouldn't fray, but you can leave it raw for a slightly shabbier chic look that will fray a little over time. Note: you cannot flame 100% cotton fabric.  Most fabrics with some polyester or acetate will flame nicely. 


To create the petals, fold 1. in half 2. in quarters 3. in eighths (it will resemble a "W" from the end) 4. sew through all layers where they come to a point and slide all the way down the thread to a knot on the other end.  


Repeat steps 1-4 for all 12 petals.  When you have all 12 circles on the thread, pull snugly and stitch back around to the first petal you sewed on. Knot off the thread and cut any excess.  This will create a little "pouf" of a flower. 


Cut a smaller circle out of felt. Mine was 1" in diameter. Spread the petals on the pouf so as to create a flat bottom for the flower and glue the felt circle onto the bottom.  Attach a pin or other clip of your choice with glue.  


The fun thing about these flowers is they can be removed and the look of the bag can be changed easily. Here's the finished product.


I am going to experiment by adding a zipper pocket inside and making a matching zipper pouch to go inside.  I also thought of ideas like adding a loop inside to attach keys to or putting a divider down the center to create two sides and make it more purse-like.  Have fun with your own experimenting!