Thursday, May 9, 2013

"Lemonade Stand" Card Set

Well, I'm still coming down off of my annual crafting retreat weekend. What fun! I can tell I still have  a lot of sleep to catch up on too but it's always so worth it. In this post I'm showing some cards I made during the weekend. The paper pack I used was from My Mind's Eye and the collection was called In Bloom. I'm choosing to call the card collection Lemonade Stand because of the lovely, soft pinks and yellows. Just love the paper! 


Friday, April 26, 2013

Spring Window Display

I figured with the temperatures FINALLY getting into the 50's, 60's and (yippee) today, 70's, it was finally time to change out the "Extravaganza Window." Yes, the Valentine's Day decorations needed to come down. The first two items I found while antiquing with my husband were a ceramic planter that looks like a pair of green rain boots and a deep blue enamelware pan with white flecks. Keeping those two items in mind, I pulled together a few other items and created this blue, green,red and yellow windowscape.


Here are a few close-ups of the four corners of the window.


The framed mirror was from Goodwill and I painted it the same deep blue as the enamelware pan and flecked it with white paint. The little yellow picture frame was from Goodwill as well and got a new coat of cheery yellow spray paint. It feels good to, in some small way, finally welcome spring into my house! Have a great weekend.


Tuesday, March 26, 2013

Faux Antique Wall Cupboard

Well, it has been WAY too long since I last posted. I've been busy working away on many projects for the last 4 months. Our big "winter project" was the finishing of the last unfinished room in our house...our laundry room. We (nearly) finished in early February and I can honestly say, it is now a pleasure to walk into that room and do a less-than-favorite chore. One of the projects that has been holding me up and prevents me from saying were are truly "finished" with the room makeover is the subject of today's post. I had in my head something very specific that I wanted to use as a storage space for my iron and various laundry sprays, lint roller, etc. I have kept my eyes peeled for an antique wall cupboard every time my husband and I are out antiquing, and trust me, we've been in a lot of stores the last 4 months. I just haven't been able to find what I pictured in my head (that NEVER happens. Ha!) Anything that I found that came close was way too spendy and a little too "antique" for me, i.e. falling apart. I finally came to terms with the fact that I was going to have to build what I wanted myself. I'm really happy with how it turned out, especially the aged paint finish. Here's how I did it: First I built a frame with one shelf in the center. My measurements came from how high I needed each shelf to be in order to fit my iron and the tallest spray bottles I had. Here's the frame glued and clamped up:

Then I made a flat face plate of sorts with a 1" x 4" that I ripped down to be 1 1/2" wide. Here it is glued and clamped up:


Next, I "married" the frame and the face plate and glued and clamped them as well.


For the door, I used left over bead board from our laundry room walls. I left it one ply thick (about 1/4"), but added two horizontal braces on the back to prevent warping. You can see this in the final pictures. I cut it to fit the opening on the front, minus about 1/8" around all four sides so it wouldn't be too tight of a fit.  Once the glue had dried on the shelf itself, I sanded it smooth, making any edges flush that weren't already. Now on to the paint. I knew from the beginning I wanted to have an antique green, chippy paint. I had seen a product at one of our favorite antique stores called "chipping cream." It's by Country Living and ever since I first saw it, I wanted to have a reason to try it. I looked at a lot of pictures online of both faux antique green finishes and genuine antiqued surfaces. I decided on a darker green for the base coat (the color that would show through) and a brighter green for the topcoat. I used Rust-Oleum 2x Coverage spray paint (my absolute FAVORITE spray paint, and it comes in tons of colors). I used Hunt Club Green as the base coat (shown) and Leaf Green for the 
topcoat.


I did prime the whole piece with a brush and Killz primer first since it was new, raw wood. Once that was dry, I sprayed the whole outside of the cupboard and a little of the inside, as well as both sides of the door, with the Hunt Club Green. Once the green was completely dry, I painted on a generous layer of the chipping cream in the areas I wanted the base color to show through. The chipping cream basically dries to kind of a hard, waxy texture and prevents the top coat from adhering well in the areas where you have painted it. You can kind of see in the pictures below how I painted it on. I focused especially on edges and areas that would naturally get more wear.


The chipping cream has to dry completely before you can paint on the top coat. When I did that layer, I made sure to fully spray the inside of the cabinet, since I hadn't completely covered it with the darker green. I didn't plan on doing a lot of scuffing off of the topcoat on the inside, just a little on the top and front edge of the middle shelf.


 With the leaf green I did 3-4 thin coats within about 15 minutes to get good coverage. I let the topcoat dry for about 3 hours. The directions on the chipping cream are to start removing the topcoat, as SOON as it is dry, in the areas over which you painted the chipping cream. I used a flat plastic scraper that is designed to scrape pots and pans when washing dishes. It worked really well.  I did try a flat metal putty knife, but that was too aggressive and dug a little too deep in some areas.


...and a close up of the distressing...


I had some old latches that I got from an antique store in Lacrosse WI for another project, but never used, and some hinges from an antique store in Albertville that I found in the original packaging and all! Once attached, here's the final cupboard:


...and all loaded up...


It still needs to be mounted, I'm thinking about how I want to do that. I'm very happy with how it turned out. My husband just came out of the laundry room and was heard saying "I can't believe how old your new shelf looks." I'll consider that success!


Sunday, November 25, 2012

Teacher Gift Tins

Well, the snow is falling and friends are calling "yoo-hoo." A new friend of mine invited me to be a part of her 16th annual Christmas Boutique this December and I have been a busy little elf the last few weeks getting ready for it.  One of the craft items I will be selling are these cute and practical gift tins, targeted especially for those looking to give their kids' teachers a gift in the $10-15 range. These fun little packages would also be great for the college student in your life, baby sitters, other office/service people that you like to give a little gift to at Christmas. I'm going to quickly explain how I made them here. I saw the basic idea on this blog here and the gal that made them on that blog found the idea at this blog. Ah the rabbit-trail that IS blog reading!

First, I did order the nugget tins from specialtybottle.com as one of the ladies recommended on her website. I looked quite a bit online and they had the best pricing. 


I carried one of these tins around with me in my purse for a couple of weeks as I was shopping for little items that would be practical and also inexpensive and, oh yeah, FIT! Once I was satisfied with what I had this is what I had amassed:


There are 2 Band Aids, 1 hand sanitizer, 1 6-piece pack of gum, a mini sharpie marker, a piece of Dove milk chocolate and one of dark chocolate, 4 Advil Liquigels, 5 paper clips in fun colors, 2 bulldog clips and a mini super glue. I kept all of my receipts and when I added up everything, including the tin, it came out to right around $4.75.  I found some really great deals like the mini bulldog clips at Office Depot in bags of 24 for $2, the hand sanitizer for $.33 (which I paid a dollar each for at Office Depot, and returned when I found them so much cheaper elsewhere!) Also the mini super glue, which I passed up because they were listed for $3.95/4 on the shelf, but I found in a bin for $2.00/4 at the checkout. Also, I purchased the Sharpie markers (which I had no idea were so spendy!) at Joann Fabric over the course of about a week and a half using 50%-60% off coupons!  Sorry to bore you with the details, but it was kind of a fun challenge to see how cheaply I could get things. Really quickly, for the Advil, I wasn't able to find the little 2-pill foil pouches like I wanted, so I ended up making my own mini containers by purchasing small plastic storage containers with a flip top (much like the ones tic-tacs come in.) I found these in the bead organization isle at Joann and, yes, I used a 50% off coupon!
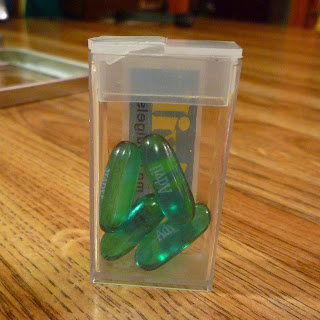

I printed labels on transparent return address labels so the recipient of the gift would know the facts.


To make the dividers for the tin, start with you largest item first and figure out how big your largest compartment needs to be. For my tins, it was the gum. Cut a piece of cardstock that is as long as the tin, and as wide as the tin plus TWICE the dimension of your divider height. 


For example, in this case the cardstock needs to be 5" long by 3 1/2" PLUS two times 3/4" (or and inch and a half) so a total of 5". Measure over from one edge to allow enough room for your first item, giving just a tad extra and score along the length of the paper.  Measure over 3/4" and score again and once again measure over 3/4" and score. You should have three parallel score marks as shown in the illustration below.


Fold on the score marks. This will create the first ridge that divides the tin into two compartments lengthwise. Continue making cardstock inserts until you have all of the divisions you want.  It will take some playing around with the space and your items to get it all laid out in the most efficient manner. Once all of my dividers where in, this is what it looked like.


Now the fun part: filling the tin!


On display:


To finish the gift off, I made a decorative enclosure for a pad of Post-It notes to be attached to the top.


They pad is permanently affixed with glue and has a magnetic closure. This one says "thank You Teacher" but I also made ones that say "Merry Christmas" and "Just For You".


Just add a little ribbon and they're ready to go, no gift-wrap required. 


I have 30 of these available, no two alike.  I will be selling them for $12 each. As a shameless plug, for those in the area the Christmas Boutique is this Saturday, December 1st. The sale goes from 9-3 pm. Kim, the hostess, has been doing this for years and she makes FOUR HUNDRED DOZEN COOKIES!!  Yes, you read that right. She also invites lots of other quality vendors. The sale is on her family farm in Scandia MN, address is 22430 St. Croix Trail North (Highway 95). If you have questions for Kim, you can reach her at 651-433-3881. Hope to see you there!