Showing posts with label Lamp. Show all posts

Wednesday, August 19, 2015

Driftwood Nautical Lamp

As snow was falling this last winter, I was dreaming and planning of decorating our "new" boat. I had a Pinterest board that was rapidly filling up with rugs, pictures, pillows, etc. I wanted to play up the nautical theme, but I quickly learned there is a very fine line between chic nautical and cheesy nautical! One of the items that I fell in love with was this lamp from Get The Lighting:


Problem was, I couldn't swallow the $108 price tag! As I've thought I million times in life, I figured "I can make that so much cheaper." Only this time I actually did. How 'bout that?! For this project I started with a pretty straight hunk of wood. I knew I could count on my father-in-law and his endless supply of firewood, and I was right. He hooked me up with the perfect piece of Poplar from one of the recent tree losses in his yard. 


For this lamp project I used a combination of DIY tutorials I've learned over time on Pinterest. The first one was this tutorial on how to make any ol' piece of wood look like driftwood. I found that it didn't work exactly as easily as the blog implied. I really had to peel and scrape the bark off and I had to leave my wood in the solution for a lot longer than they indicated, but that may be a difference in type of wood/tree. I actually did like the way all of the extra soaking and sun drying put cracks and splits in the wood though. After a few days of soaking, a few times scraping and peeling bark, several days sun-baking and some sanding to round the edges, this is what I was left with:


The other thing that didn't turn out quite the way the DIY Driftwood blog post said was the color. The wood was still quite "fresh" looking and not nearly the aged color I was hoping for. I used a thin wash of my wood aging solution I also found on Pinterest. (I love this trick and use it a lot!) I also did a thin layer of Minwax stain in Sunbleached and dabbed on some random streaks of Weathered Grey. I was left with this as the final product:


I had my husband help, and my father-in-law donated the use of his drill press, and we put a 1/2" hole straight down the vertical center of the log. I also had John drill a smaller diameter hole down near the base of the lamp, perpendicular to the center hole so the cord would exit on the side rather than straight out the bottom. I used this inexpensive lamp kit from Menards to add the electrical component. 


For the rusty cleat on the side, which really gives that lamp a nautical touch, I purchased a cheap cleat from West Marine. When I got it, it was fully galvanized to prevent rusting , which you don't want on  dock of course. 

However, for a fun, weathered lamp, you want it rusty (of course!) I soaked it in straight vinegar for about 48 hours. That removed all of the galvanization. To add a layer of rust, I used YET ANOTHER Pinterest-learned trick (which I also use  LOT) and sprayed it with a solution of vinegar, peroxide and salt that I learned on this website. 


Pop on a cute Target shade and a bulb and it looks perfect in its new spot! Perfect for those rainy nights curled up on the couch watching a movie or reading. 


Monday, February 6, 2012

Art Deco Lamp Makeover


This past summer, I bought this vintage gooseneck lamp at an occasional sale I frequent in Carver, MN. When I bought it, it was displayed with its somewhat off kilter lamp shade turned upsidedown and a plant in it. No bulb. No cord. It looked something like this:

I think I paid something like $5.00 for it.  Its cord had been cut, I didn't even care if it worked or not. I planned on using it as a plant stand as I saw it displayed in the store.  And that's what I've done for the last several months.  Recently, I've been looking for some fun vintage lighting for a desk my husband and I are building.  On the internet I came across these cool art deco gooseneck lamps that looked vaguely familiar, but I couldn't think of why.  Then it hit me; that's the same kind of lamp I've been using as a plant stand for months!  As it turns out, they fetch a pretty penny on online auctions. Mine didn't look as nice, and I wasn't even sure if it could be restored to working order. But I loved the vintage details, even the cool GE knob.


I asked my husband to wire in a new cord so we could see if it would function.  I was so excited when it did!  Now, I could have used it as it was.  I don't really mind the aged patina...kind of like it actually, but I found this website while I was looking for lamps that has really fantastic reproduction barn lights. The website is http://www.barnlightelectric.com/. I would love to purchase one of theirs but it's out of my budget. This got me thinking about what I could do to the shade that would be fun, unique and vintage-y.  I have a few pieces of enamelware in my family room and between the barn lighting inspiration and the fact that I love the enameled look, I got the idea to paint it to look enameled. First I took it apart.


I used blue painter's tape and taped off the threads that screw the shade onto the base. (In the end, this didn't matter as I ended up painting the threads anyhow, but it depends on how tight of a fit you have.  Mine originally screwed on a bit loosely as I implied before when I mentioned it was off kilter.) I steel wooled the shade thoroughly inside and out and used tack cloth to remove the dust. I picked a color that a.) I love b.) makes me think vintage c.) matches an antique fan that we already have.  I used a spray paint that specifically said it works on metal. First, I painted the the outside by spraying on many thin coats until I had good coverage. Make sure to do this in a well ventilated space.  I always spray outside because of the mess. I let this dry completely.


Once the outside of the shade was covered to my satisfaction and dried, I painted the inside.  I chose to go with white on the inside to add to the enameling effect.  I used gloss white, however, the jade color only came in satin finish. I'll tell you what I did about that in a minute. 


As you can see I didn't worry about having a nice, clean line at the edge, because I planned on covering that.  The way I kept the white from getting on the jade when I sprayed it was by placing a plastic bag over the outside of the lamp shade and using blue painter's tape to "seal" the bag around the lip of the shade.  As you can see, a little white got on the outside of the neck, but I'll tell you what I ended up doing there.  Now, the final touch that gives it that farmhouse enamel look.  I poured gloss black enamel paint into a shallow dish just a tin bit larger than the diameter of the lamp shade.  I eyeballed how deep I thought the paint needed to be to caver the lip of the shade.  Then I carefully dipped the shade in the black paint, being careful to keep the shade level and parallel to the surface of the paint.  I dipped the shade in until it just covered the rim. 


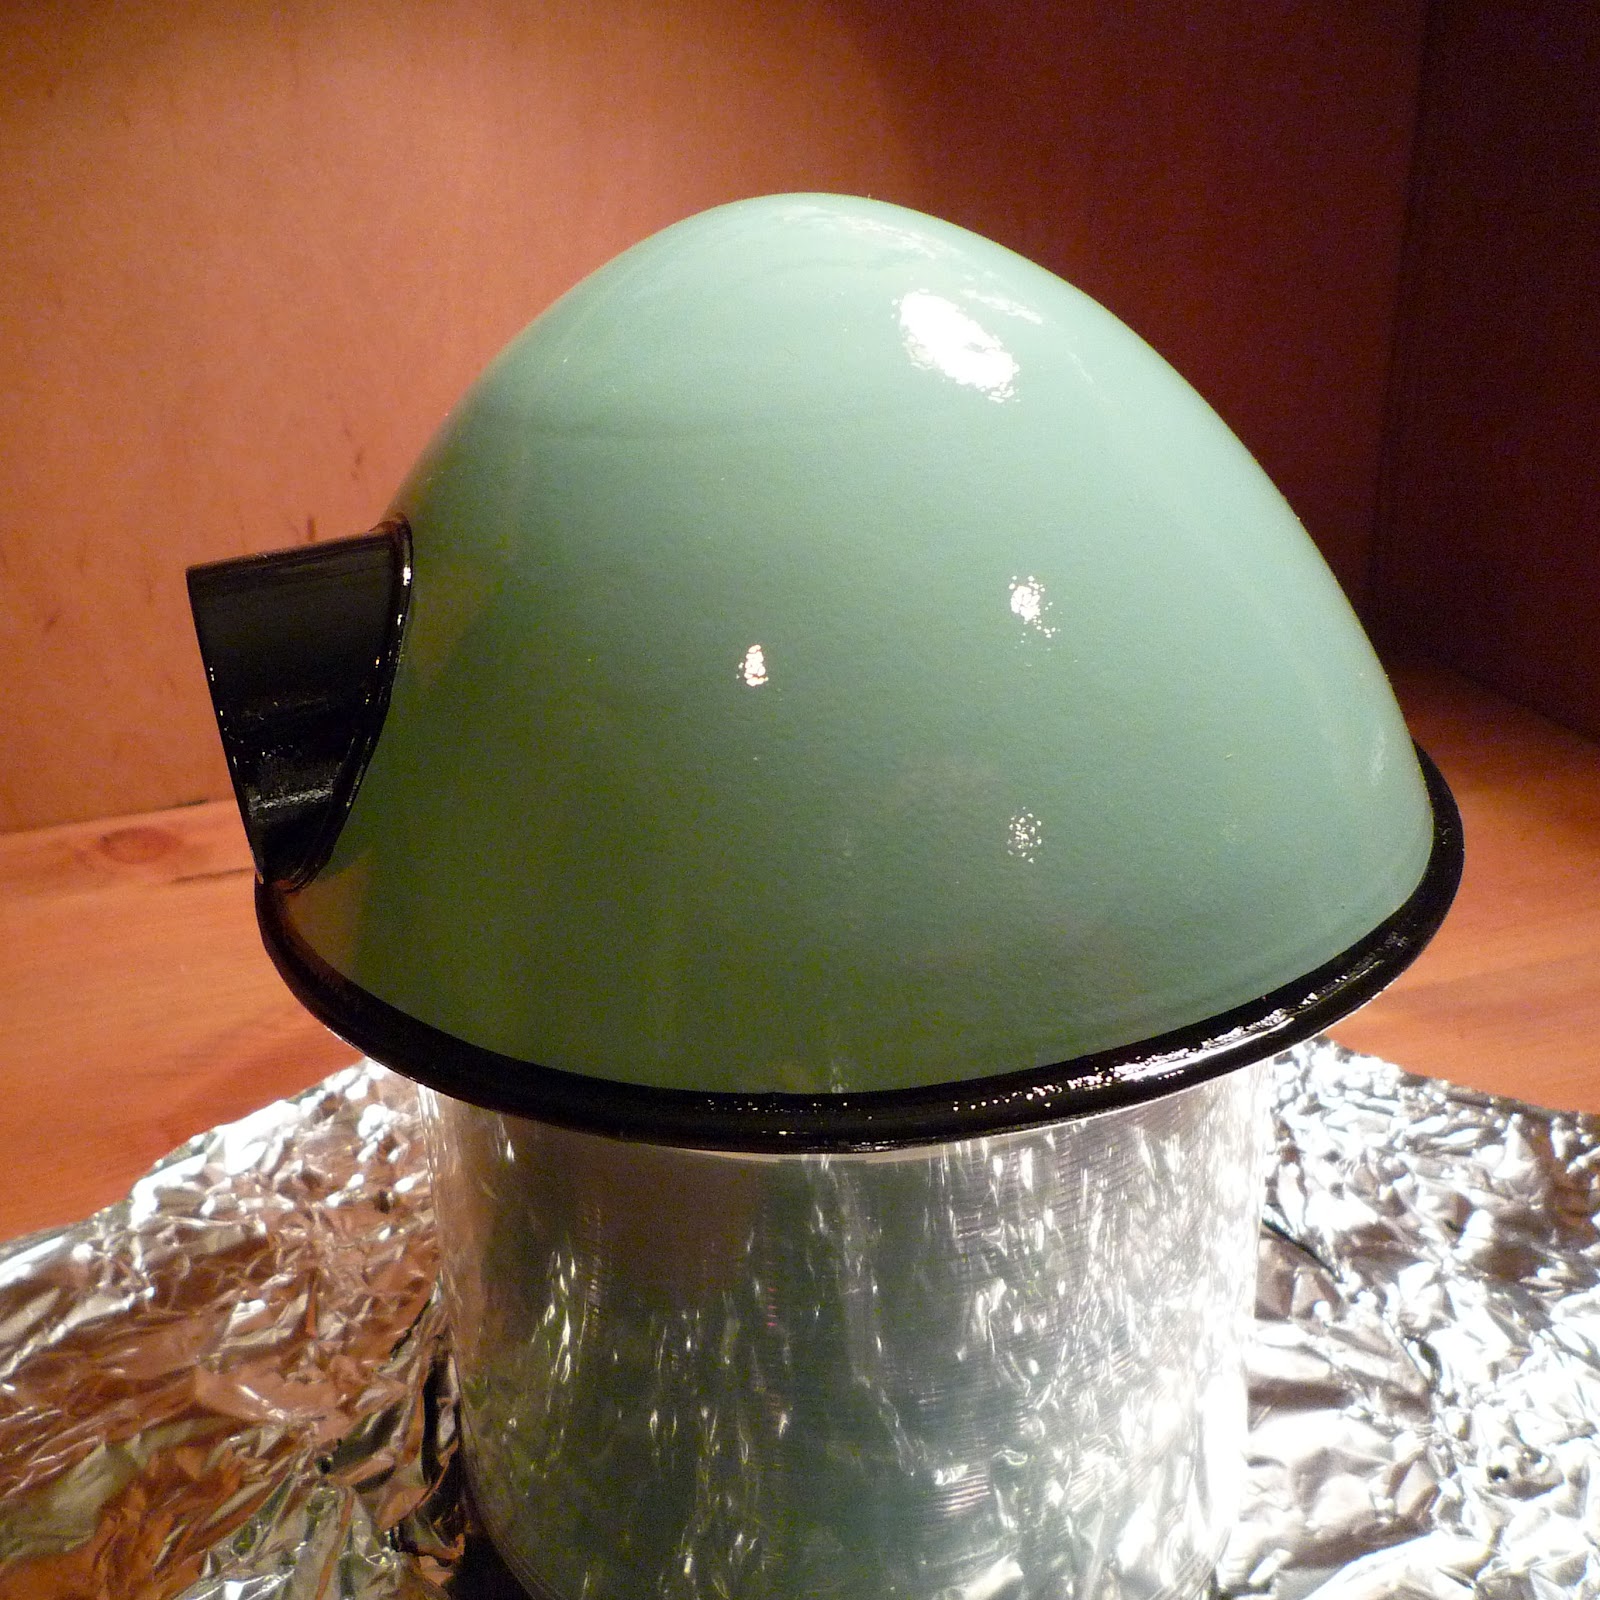
Then, keeping the shade level, I carefully lifted it out and used a sponge brush to wipe away drips as they formed.  I had to brush away drops for several minutes until the paint finally stopped dripping, but the enamel is pretty thick, so it didn't take too long.  To allow the paint to dry without running down into the shade, I propped it over something with a slightly smaller diameter and let it just "hang" there until it was completely dry.  Make sure you have something spread out underneath to catch drips. I used tin foil.


You can see in the above photo how I dealt with the white splotches I got on the neck of the shade.  I ended up painting the whole thing black.  The black ends up being a better visual transition from the patina of the lamp base to the jade paint on the shade.  I hand painted it with a small craft paintbrush and followed the contours of where the neck meets the shade to get a nice straight line. Earlier, I mentioned that the jade paint only came in satin finish.  I really wanted the glossy look of enamel, so the final step was to spray several thin coats f a high gloss clear paint on the outside.  The black on the rim and the white on the inside are already glossy, so I only needed to spray the outside.  Once thoroughly dried, I was able to assemble to lamp back together.  I had purchased a fun oblong bulb from Seven Corner's Hardware in St. Paul http://www.7corners.com/. Side note, this is a super fun place to visit if you live close by. They still hand calculate and hand write all their receipts!  It's a refreshing change from the big box hardware/lumber stores. 
Anyhow, here's the finished product.  I really love how it turned out and would jump at the chance to do another one if the right deal comes along!