Sunday, October 14, 2012

Baby Girl Shoes


 Well, I'm still coming down off of the fun of celebrating my friend Anna's baby shower.  So excited for her and her husband! What a lovely day!  There's something about baby girls and PINK that are so fun to work with.  This shower was pink with a capital P. The gift I gave Anna included a pair of baby shoes that I learned to make this past spring, thanks to my friend Lauren and her turning me on to the website Joyfolie. The woman at that website makes AMAZING baby shoes (and adult women's too) and sells a PDF pattern on her Etsy store for a simple baby shoe you can make at home. Here are the steps I used since I modified the pattern a little. First, cut out four pieces of each pattern piece, one out of the outer fabric and one out of the lining. Make sure to fold the fabric so either the right sides are together or the wrong sides are together before you cut so that the pieces will be mirror images of each other. If you don't make the pieces mirror images, you'll have shoes for two left feet (or two right feet!)  


Take the lining piece for one of the shoe uppers and stitch along the back of the heel, right sides together. Iron seam flat. Repeat for the other lining upper piece.


Pin the upper to the sole, right sides together.  The first shoe I sewed, I thought more pins = better.  It actually worked better on the second shoe with only a few pins around the edge. Stitch.


Next, clip close to the stitching (but not THROUGH it) around the curved parts of the toe and heel and press the hem under, towards the bottom of the shoe. Using a very thin layer of fabric glue, glue both layers of the hem down to the sole of the shoe.


Flipped over, it should look like this:


Repeat all of the above steps for the outer shoe fabric.


Now, with both the outer and the lining pieces turned inside out, apply a very thin layer of fabric glue to the whole sole of one piece and carefully line up the edges and adhere the other piece so they are glued sole-to-sole. Try to pinch and glue all the way to the edge. I prefer Beacon Fabri-Tac because it's thick and won't run or bleed through, adheres almost immediately, and dries fast.


Once the glue is dry enough to work with, turn the outside fabric right side out and work the lining in to place. Add a very thin layer of fabric glue between the lining and outer fabric on the sides and top of the shoe to hold the lining in place. If your lining fabric sticks up past the outside fabric in any spots, trim it so the raw edges are even.


You can use store bought bias tape, or make your own out of matching or contrasting fabric. The bias tape will be used to finish off the raw edge. To make your own, cut a 1" piece of fabric at a 45 degree angle to the grain of the fabric. Iron in half and then fold the raw edges in to the center so it's fold in quarters and steam press. You will really only need a small length of bias tape. Sorry I didn't measure the exact amount! This is how the fold should look from the end:


Use your trusty fabric glue again and, starting at the back of the heel and a little bit past the center line, glue the bias tape around the opening of the shoe.  Try to get the glue as close to the edge of the bias tape as possible, but not too much so that it squishes out. Try to get the raw edge of the shoe opening to nestle into the fold in the center of the bias tape.  Go around the entire shoe opening and back to the center of the back heel, overlapping slightly the end where you started.  Make sure the exposed end is glued well so it doesn't fray.  


To embellish I used two TEENY TINY flowers made using the technique I taught the February "Fabric Flower Clips" tutorial. Here are the finished shoes:


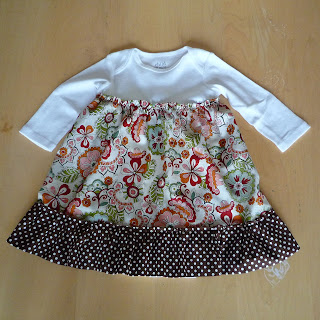
The baby gift was made complete by sewing a very quick and easy dress-made-from-a-onsie I found on this blog through Pinterest.


Since the onsies come in a three-pack, I jazzed up the two remaining ones with one simple fabric flower.


Pretty cute, pretty girly, pretty fun to make!


Sunday, October 7, 2012

Vintage Coffee Sign

While my husband and I spent the summer weekends at the marina we belong to, we got in the habit of going just a couple of miles up the road for breakfast every Saturday morning.  The little diner at the top of the hill is called The Point and has not only great, classic breakfast and coffee, but also some of the most entertaining small town, farmer-talk to eavesdrop on.  We enjoyed our mornings!  One of the other great things about The Point on the weekends is the wait staff; Rocky, Susie and Julie got to know us by part-way into the summer and had even put our order in to the the cook a couple of mornings before we walked through the doors, having seen us walking across the parking lot!  Towards the beginning of the summer John started teasing one of the gals, Susie, about getting bigger coffee cups so she wouldn't have to make so many trips to our table.  A week or so after that, remembering John's comments, Sue came out to the table with two huge coffee cups they keep back in the kitchen for "special" customers.  That continued right on through to the end of the summer.  As we got close to our last weekend for the summer, John and I decided it would be fun to give the waitresses something as a thank you for treating us so nicely all summer and also as a "remember us until next summer." Jokingly, John said something about making a sign that said "Small coffee cups are for wussies." I thought that sounded like a great idea and so here I walk you through the process by which I made our favorite waitresses their end of summer gift.

The first step to making this vintage coffee wall sign was to create and image on the computer.  While I love designing and creating digitally, I in no way claim to know what I'm doing.  I just know that I usually get the result I want by the end. I'm sure there are more efficient ways to design if you know your software.  I choose to use Microsoft Word most of the time because I've used it a lot and am familiar with it.  For this project I also used my Creative Memories Storybook Creator 4.0 because it is such a versatile and user friendly program.  To get inspired and get the feel of what a vintage coffee sign should look like, I did a Google images search.  This helped me pick colors and fonts. Here's the final image I came up with for our sign:


In my haste to get this project done, I made a rookie mistake.  If you are using an image with text on it, or if you are particular about the orientation of the image, DON'T FORGET TO INVERT (MIRROR) YOUR IMAGE!!!  It should look like this when printed:


You need to have this printed on regular printer paper and on a laser printer for the technique to work that I'm going to show you. This technique came from a Pinterest idea and comes from the blog Katie's Rose Cottage.
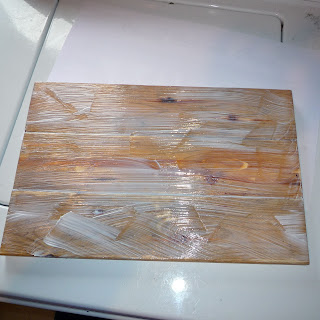
Once you have your image printed, you can determine the proper size for the wooden sign to be.  Mine came out to be 10" high by 15 1/2" long.  To make the wooden portion, I cut three slats of 1x4 that were 15 1/2" long.  When laid out side by side they totaled 10" wide.  I did mine in 3 pieces because I wanted it to have the look of an old pallet or piece of siding or something. That's just my aesthetic  You can do one solid piece of wood if you like.  To frame out the sign, I also cut some 1 1/4" strip pieces to go around the edges.  As you will see in the picture below, I aged the wood for the main body of the sign by using a technique that I also found on, you guessed it, PINTEREST! You can find the technique here if you are interested. I also had sanded off the long sides of the three pieces before aging them. This way the fact that it's three separate pieces would really stand out.


Next, glue the three 15 1/2" antiqued pieces together and clamp for an hour or two. After un-clamping, coat with a nice thick layer of acrylic gel medium, available at your local craft or art store. Make sure to get all the way out to the edges.


Once coated, center your printed image and lay face down into the adhesive  Use a plastic scraper or similar tool to smooth completely and get out any air bubbles. Try to avoid wrinkling the paper during this step.


If you make your wooden piece in sections like I did, make sure to really push the paper into the grooves between the sections. This will help insure that your image transfers into the grooves instead of there being a void in your picture where these lines are. 


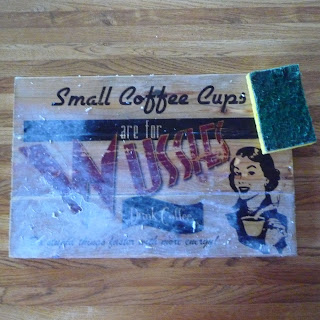
Make sure to clean all of the gel medium off of the edges of the wood after you squeegee it out.  You will have a fair amount squish out the sides, but that's OK.  It's much better to have a little too much glue rather than not enough.  If you use too little glue, your image will not transfer properly.  If you are like me and patience is something you could use a little more of, this next step is painful!  You have to let the paper/glue dry overnight (or at least 6 hours). Not only am I usually super excited to see the final product at this stage in a project, I'm usually working on it right up until the MINUTE I need it. So yeah, waiting is not my favorite. Trust me. Wait for this to dry overnight. Once completely dry, use a very wet rag and a gentle scratch pad to soak and remove ALL of the paper.  As you can see, the image stays affixed to the wood.  It does take a little elbow grease, but don't rub too hard or you risk taking off a little of the image. 


To frame out the sign and give it a nice finished edge, take the four trim pieces (I've painted mine red prior to this step and lightly sanded/distressed the edges) and glue and clamp evenly on the edges of the  main sign. Wait 1-2 hours for the wood glue to adhere.


For a final touch and to antique and age the sign slightly more, you can use one light coat of stain over the whole sign, including the trim pieces. To seal everything and make this wall hanging easier to dust, spray 1-2 coats of clear varnish over the whole works and let dry.  Attach a picture hanger on the back and you're finished.  This is a really inexpensive project and can be made in just a few hours (not counting waiting time!) Here's the final project:


Our friends the waitresses loved their gift and we found out when we gave it to them that the owner JUST ordered bigger coffee cups for the whole diner!